Host your org's GitHub runners in Azure Container Apps

Getting started with GitHub Actions is easy with the GitHub-hosted runners: you write your workflow and run it instantly on GitHub’s infrastructure. But many organizations want to use their own machines to run the workflows for customization, governance, security and/or cost reasons.
What if your could use a managed service like Azure Container Apps instead of virtual machines for that ? In this post I will show you how to do that with Bicep and GitHub Actions.
This is a two-part series, the second part focuses on the scaling aspect of Container Apps.
Note that this post is dedicated to runners for an organization, not for your personal account. There are still many things in common, and some differences (regarding authentication mostly).
If you need an introduction to Azure Container Apps, the best place is the official documentation. Also the GitHub docs about self-hosted runners is here if you need.
GitHub repository and organization
For the purpose of this series I have created my very own GitHub organization (for free, you can create your own too !), and carefully crafted a repository. I will show only the most important snippets of the code in the post, you can still browse the repo to grap all the details.
The repo contains a Dockerfile, GitHub workflows and Bicep code to create the necessary resources in Azure, and run a “hello world” Azure CLI script on the self-hosted runners.
This diagram shows how these components interact together: 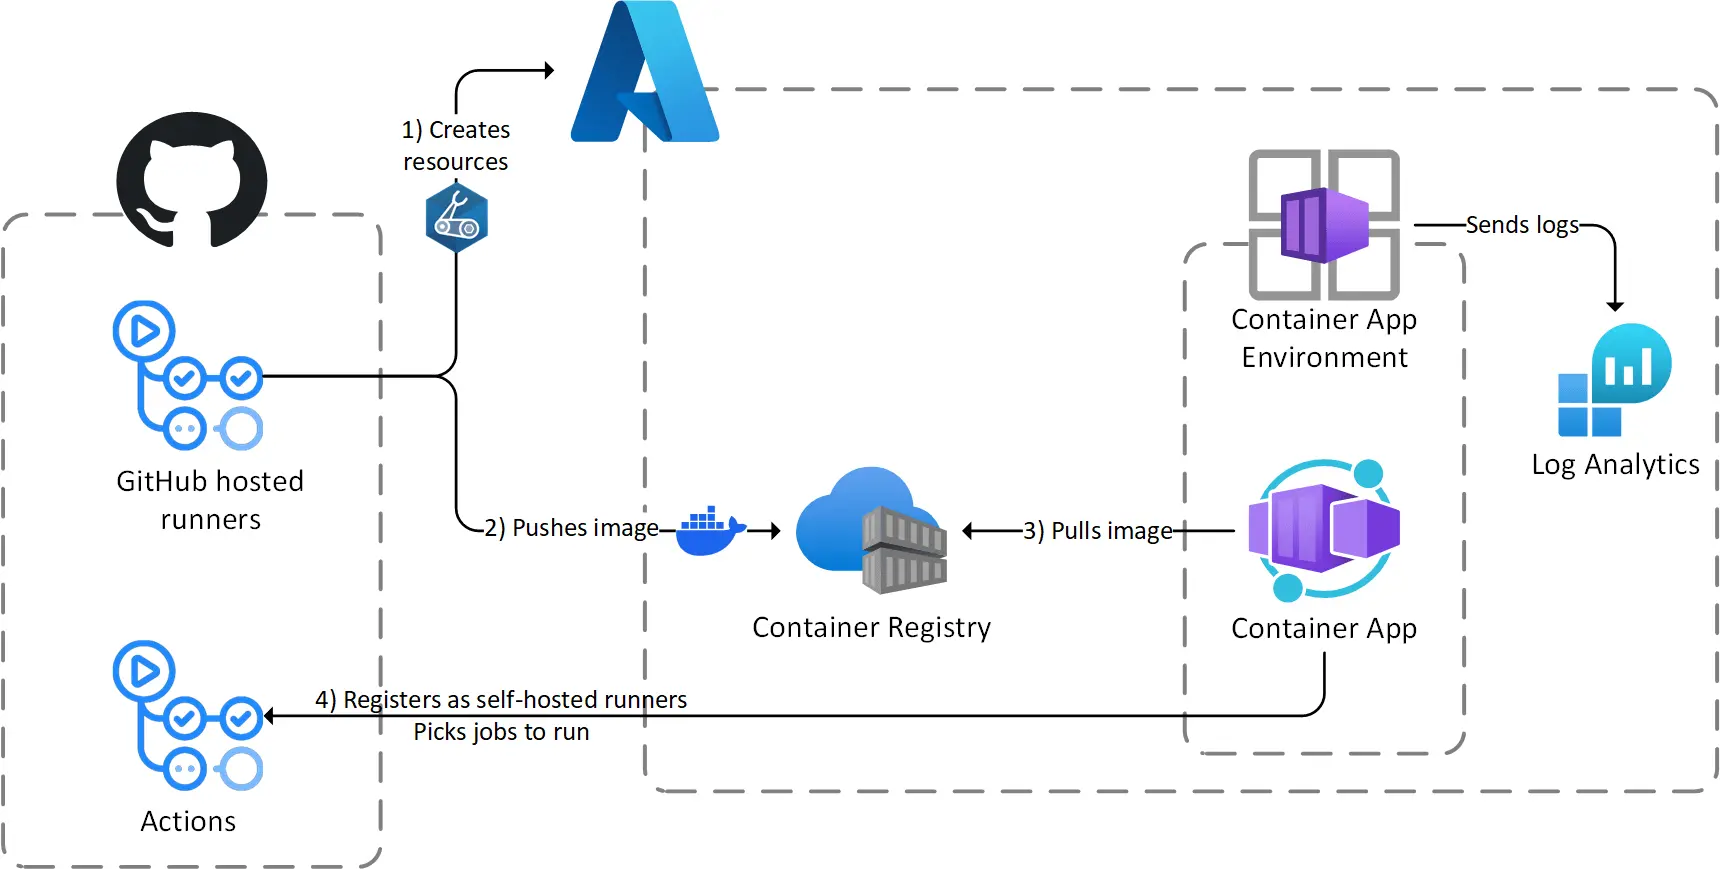 This is what the architecture looks like
You can follow the instructions in the README of the repo to deploy runners in your environment. The rest of the post explains how the solution works, not how to deploy it step by step.
Create a Dockerfile (or use another one as a base)
A Dockerfile is required to build the image of the runners, there are several options for that:
- Use an image provided by GitHub as a base. Unfortunately I have discovered this after writing this post so I haven’t tried it now 🫠
- Create you own Dockerfile from an OS base (as I first did here)
- Use a third-party as a base like one from this excellent repo.
I have chosen the third option so my Dockerfile is very simple:
1
2
3
4

FROM myoung34/github-runner:ubuntu-jammy

# install Azure CLI
RUN curl -sL https://aka.ms/InstallAzureCLIDeb | bash
The base container image is very flexible and requires several environment variables, but we’ll get into that later.
Create a GitHub App
Self-hosted runners use the GitHub REST API to register themselves and query the jobs they have to run. For organizations, the recommended authentication method is to use a GitHub App: the workflows will use a private key to generate tokens to use to authenticate against the REST API.
The creation a GitHub App starts from the Developer Settings of your organization. The most important settings are the permissions, for this project we need the following scopes:
- In Repository permissions:
- Set
ActionstoRead-only - Set
MetadatatoRead-only(it should be selected by default) - Set
VariablestoRead and write. This is not required for the runners but for one of my workflows
- Set
- In Organization permissions:
- Set
AdministrationtoRead-only - Set
Self-hosted runnerstoRead and write
- Set
After that the process prompts us to generate a private key that the browser downloads as a .pem file, and to install the app in our organization (for all or a selection of repositories).
The private key is used to generate access tokens with the identity of the GitHub App. Ideally it should go in a Key Vault but for this demo I have chose to put it in a Action secret.
Deploy the Azure resources
It’s time to provision some stuff in Azure, starting with:
- A container registry to store your container images
- A Container Apps environment, to define the pricing, networking and logging settings of one or several Container Apps (one in our case)
- A Log Analytics Workspace to send your logs to. This is optional but very handy in case of troubleshooting
You can create these from the portal, or if you have forked the repo run the workflow that does this for you. Then after building and pushing the container image to the registry (using the az acr build command) we can move on to create the Container App.
Provision the runners
For the creation of the Container App I will walk through the related GitHub Action workflow as there are a few gotchas along the way.
Generate an access token
As mentioned earlier, self-hosted runners need to authenticate against the GitHub REST API, that’s where the GitHub App comes in.
But the private key generated earlier is not passed to the Container App, it is used to generate a short-lived token that we pass to the runner. This is done by the following step in the workflow:
1
2
3
4
5
6
7

- name: Generate access token
  id: generate-access-token
  uses: actions/create-github-app-token@v1
  with:
    app-id: ${{ vars.GH_APP_ID }}
    private-key: ${{ secrets.GH_APP_PRIVATE_KEY }}
    skip-token-revoke: true
A few interesting things here:
- The GitHub App id is stored in an action variable (as it’s not sensitive), the private key in an action secret (as it’s of course sensitive)
- This step uses a verified action from the marketplace
- Note the use of the
skip-token-revokeproperty: by default the generated token is automatically revoked at the end of the workflow. We don’t want that here as the token will be used after the deployment and we want to avoid 401 errors.
Provision the runner
Then the deployment of the runner is triggered by this step in the workflow:
1
2
3
4
5
6
7
8
9
10
11
12
13
14

- name: Bicep deploy
  uses: azure/arm-deploy@v1
  with:
    scope: resourcegroup
    resourceGroupName: ${{ vars.RG_NAME }}
    template: ./infra/02-app/main.bicep
    parameters: >
      project=${{ vars.PROJECT }}
      acrName=${{ vars.ACR_NAME }}
      acaEnvName=${{ vars.ACA_ENV_NAME }}
      imageTag=from-base
      gitHubAccessToken=${{ steps.generate-access-token.outputs.token }}
      gitHubOrganization=${{ github.repository_owner }}
    deploymentName: deploy-aca-gh-runners-app
Nothing uncommon here, we notice that the previously generated token is retrieved as an output of the generate-access-token step and passed as a parameter to the Bicep deployment. We have to send it up to the container alongside the name of our organization, found in the github context.
In the Bicep code (stripped down for readability, full version is here), you can see how the values are passed to the container:
1
2
3
4
5
6
7
8
9
10
11
12
13
14
15
16
17
18
19
20
21
22
23
24
25
26
27
28
29
30
31
32
33
34
35
36
37
38

resource acaApp 'Microsoft.App/containerApps@2023-05-01' = {
  // ...
  properties: {
    // ...
    configuration: {
      // ...
      secrets: [
        {
          name: 'github-access-token'
          value: gitHubAccessToken
        }
      ]
    }
    template: {
      containers: [
        {
          name: 'github-runner'
          image: '${acr.properties.loginServer}/runners/github/linux:${imageTag}'
          env: [
            {
              name: 'ACCESS_TOKEN'
              secretRef: 'github-access-token'
            }
            {
              name: 'RUNNER_SCOPE'
              value: 'org'
            }
            {
              name: 'ORG_NAME'
              value: gitHubOrganization
            }
            // ...
          ]
        }
      ]
    }
  }
}
We are using environment variables, some of them are hard-coded, such as the RUNNER_SCOPE, set to org as we are in an organization context. The ORG_NAME variable receives its value (the name of the organization) from a Bicep parameter.
Most of the variables are plain text, except the ACCESS_TOKEN where a reference to a Container App secret is used for the access token. A Key Vault can be used here for increased security, but simplicity was preferred for this demo.
See the runner in action
Once the deployment is complete (and successful 🤞), a single runner should be visible in GitHub both from the settings of your fork and your org:  This is from the settings of my repo
In the Azure portal, the runner output is visible from the Log stream panel of the Container App:
1
2
3
4
5
6
7
8
9
10
11
12
13
14
15
16
17
18
19
20
21
22
23
24

Runner reusage is disabled
Obtaining the token of the runner
Ephemeral option is enabled
Configuring
--------------------------------------------------------------------------------
|        ____ _ _   _   _       _          _        _   _                      |
|       / ___(_) |_| | | |_   _| |__      / \   ___| |_(_) ___  _ __  ___      |
|      | |  _| | __| |_| | | | | '_ \    / _ \ / __| __| |/ _ \| '_ \/ __|     |
|      | |_| | | |_|  _  | |_| | |_) |  / ___ \ (__| |_| | (_) | | | \__ \     |
|       \____|_|\__|_| |_|\__,_|_.__/  /_/   \_\___|\__|_|\___/|_| |_|___/     |
|                                                                              |
|                       Self-hosted runner registration                        |
|                                                                              |
--------------------------------------------------------------------------------
# Authentication
√ Connected to GitHub
# Runner Registration
√ Runner successfully added
√ Runner connection is good
# Runner settings
√ Settings Saved.
√ Connected to GitHub
Current runner version: '2.311.0'
2023-11-22 15:48:14Z: Listening for Jobs
To test the runner, I have prepared a very simple workflow to run a few Azure CLI commands.
The most important lines are here, it’s how we tell that a job must be picked-up by a self-hosted runner:
1
2
3

jobs:
  test:
    runs-on: self-hosted
In the other workflows, the runs-on property is set to ubuntu-latest, so that the job is picked by runner managed by GitHub.
Once the Test self-hosted runners workflow has started, the GitHub UI shows that the self-hosted runner picks the job and becomes active:  Entering active mode…
Digging in the workflow run UI, we can see in the output of the Set up job step the name of the runner and that the machine name matches with the revision of the Container App: 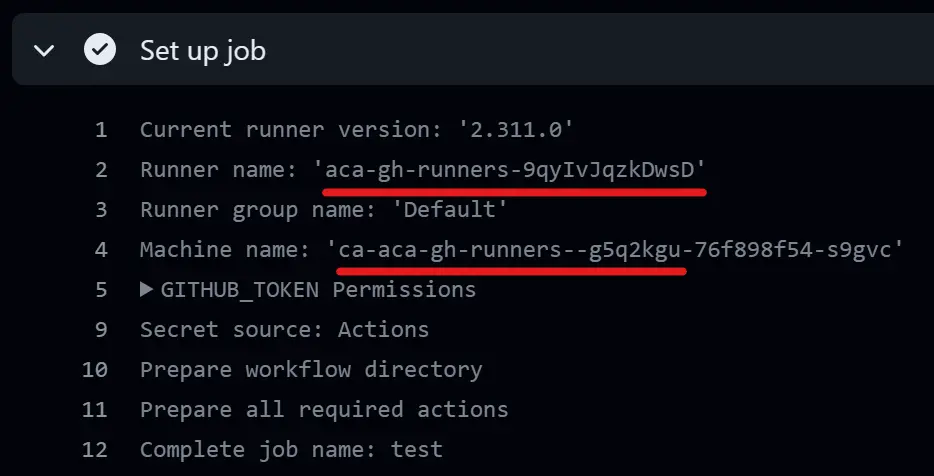 The machine name is indeed the name of the replica
One last word about Managed Identities
One thing I did not mention is that the workflows running on GitHub-hosted runners authenticate to Azure using the azure/login action, like this:
1
2
3
4
5
6

- name: Azure Login
  uses: azure/login@v1
  with:
    client-id: ${{ vars.AZURE_CLIENT_ID }}
    tenant-id: ${{ vars.AZURE_TENANT_ID }}
    subscription-id: ${{ vars.AZURE_SUBSCRIPTION_ID }}
Of course it uses the federated mechanism (without secret), which is awesome and can be automated if you follow this post from my friend Alexandre 👌.
For the testing workflow, running on the self-hosted container, I wanted to skip this step and authenticate to Azure using the user-assigned managed identity (already associated with the Container App for pulling images from the registry).
This was not as easy as it sound, I ran into the following issues:
-
az login --identitydid not work even if a single managed identity is assigned (despite what I understood from the docs) - Specifying the
clientIdlike thisaz login --identity -u <clientId>did not work either, resulting inFailed to connect to MSI. Please make sure MSI is configured correctly.errors 🤔
Research lead me to this issue on GitHub, explaining that the problem comes from the Python SDK, so that Azure CLI uses the wrong endpoint for authentication.
A nifty workaround is to set an environment variable to trick Azure CLI into thinking it’s running in an App Service container, as App Services fortunately use the same endpoint as Container Apps.
So the overall solution consists in adding these two environment variables in the Bicep code creating the Container App:
1
2
3
4
5
6
7
8
9
10

{
  // This is for tricking az cli (the value doesn't matter)
  name: 'APPSETTING_WEBSITE_SITE_NAME'
  value: 'az-cli-workaround'
}
{
  // This is the client id of the user-assigned managed identity
  name: 'MSI_CLIENT_ID'
  value: acaMsi.properties.clientId
}
And in the workflow running on the self-hosted runner, the Azure CLI script look like this (and doesn’t uses the azure/login step):
1
2

az login --identity -u $MSI_CLIENT_ID
az account show
Wrapping-up
This concludes the first step in the series about GitHub self-hosted runners and Azure Container Apps. This was quite a consistent step (and a long post !) as it covers the essentials of the solution.
The next episode will add scaling on top of that, this is where Azure Container Apps shine in this scenario. It should consist in a shorter post 😅
In the meantime, keep in mind that this is a first step and there are many things to consider when managing you own runners in containers:
- You might have several kinds of runners to manage, depending on software requirements and/or RBAC. You’ll have to organize these using labels.
- You will also need several container images for your runners, with a common base-layer of you own. This mean you will have to update these images frequently, re-build them, test them, etc.
- All runners may not have the same level of access in your Azure environment, you can implement that using different managed identities for your Container Apps and runner groups in GitHub.
- One the main reason to use your own runners is to integrate them in your virtual network, you can do that on the Container App Environment
This how it begins, thanks for reading this far, see you soon for the second part 👀