TLS with Terraform and Azure: get certificates from Let's Encrypt
This post has been updated in late December 2024 with the use of the
azurednsDNS provider instead of the now deprecatedazureone
Following my previous post on generating self-signed certificates with Terraform, this one is the second post of the series.
This time we are going to use Let’s Encrypt as the certificate authority (CA) instead of our own machine. As a result we will get trusted certificates that can be used in production, for free.
Previously in the “TLS with Terraform and Azure” series…
If you haven’t read my previous post you can check out this section to get the common context for the whole series.
There is also a GitHub repository that contains all the code from this series of posts.
Level 2: requesting a certificate from Let’s Encrypt
If you don’t know what Let’s Encrypt is, in a few words it’s a free, automated and open certificate authority (CA), allowing everyone to get certificates trusted by browsers at no charge.
As the Let’s Encrypt certificates are valid for 90 days (instead of one year for commercial authorities), automation is strongly recommended.
So how can we automate this with Terraform ? Using the third-party provider ACME. ACME stands for Automated Certificate Management Environment, the protocol used by Let’s Encrypt. The Terraform ACME provider supports any ACME CA, so we need to configure Let’s Encrypt’s endpoint in the provider configuration:
1
2
3
4
5
6
7
8
9
10
11
12
13
14

terraform {
  required_providers {
    # The provider is declared here just like any provider...
    acme = {
      source  = "vancluever/acme"
      version = "~> 2.0"
    }
  }
}

# ...and is configured here, with the Let's Encrypt production endpoint.
provider "acme" {
  server_url = "https://acme-v02.api.letsencrypt.org/directory"
}
Let’s Encrypts provides a staging endpoint you should use for testing:
https://acme-staging-v02.api.letsencrypt.org/directory
There is a limit of 50 certificates per domain and per week on the production environment, on the staging it’s 30,000 (but the certificates will not be trusted by the browser)
Once the provider properly configured, we can start creating resources. As for self-signed certificates, it starts here with a private key, and using this private key and an email we create a registration which is an account on the ACME server:
1
2
3
4
5
6
7
8
9
10

# Creates a private key in PEM format
resource "tls_private_key" "private_key" {
  algorithm = "RSA"
}

# Creates an account on the ACME server using the private key and an email
resource "acme_registration" "reg" {
  account_key_pem = tls_private_key.private_key.private_key_pem
  email_address   = var.email
}
Then we can request a certificate using our account, this is where the real magic happens:
1
2
3
4
5
6
7
8
9
10
11
12
13
14
15
16
17
18
19
20
21
22
23

# As the certificate will be generated in PFX a password is required
resource "random_password" "cert" {
  length  = 24
  special = true
}

# Gets a certificate from the ACME server
resource "acme_certificate" "cert" {
  account_key_pem          = acme_registration.reg.account_key_pem
  common_name              = var.common_name # The hostname goes here
  certificate_p12_password = random_password.cert.result

  dns_challenge {
    # Many providers are supported for the DNS challenge, we are using Azure DNS here
    provider = "azuredns"

    config = {
      AZURE_RESOURCE_GROUP = var.dns.zone_rg_name
      AZURE_ZONE_NAME      = var.dns.zone_name
      AZURE_TTL            = 300
    }
  }
}
The key part is in the dns_challenge block of the acme_certificate resource.
Before generating a certificate for our domain, Let’s Encrypt checks that we own that domain. To do that it proceeds with a DNS challenge, basically it generates a random string and will not generate the certificate unless that random string is in a specific TXT record of the DNS zone.
Obviously the ACME provider does that for us, we just need to let it access our DNS zone. The provider supports many DNS providers, in this case we are using azuredns.
So we need to tell the ACME provider where our DNS zone is, so we specify its name and resource group name in the config block above. And as the azuredns DNS provider supports the same authentication methods as the azurerm Terraform provider, the required configuration is done.
Be sure to use the
azurednsDNS provider and not theazureone which is now deprecated and required a client id and a client secret.
Once the full code has been applied you can check out the Activity Log of your DNS zone.
You should see that the service principal corresponding to the environment variables has created and deleted a TXT record in the zone :  The creation and deletion of the TXT record should occur within a minute
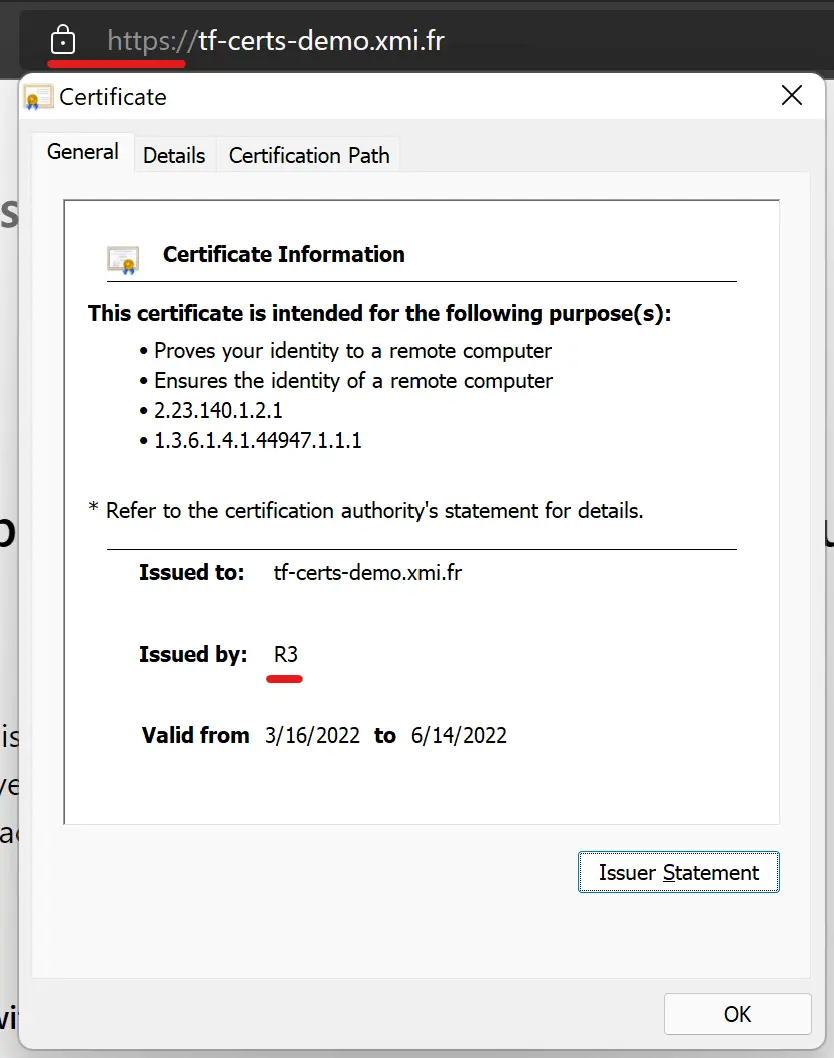
And more importantly you can browse your App Service from its custom hostname and see how your browser enjoys this fresh trusted certificate:
 Note the R3 issuer which is Let’s Encrypt, and the absence of security warning ✅
Wrapping up
That’s if for this post, which is the one why I have started this series. At first I had trouble understanding how this Let’s Encrypt/ACME provider works and didn’t find any content showing a full example. So I hope this post makes sense and helps other to issue trusted certificates using Terraform.
Don’t hesitate to dive into Let’s Encrypt documentation as well, they explain in detail how the DNS challenge works, as well as the service itself and their certificate chain.
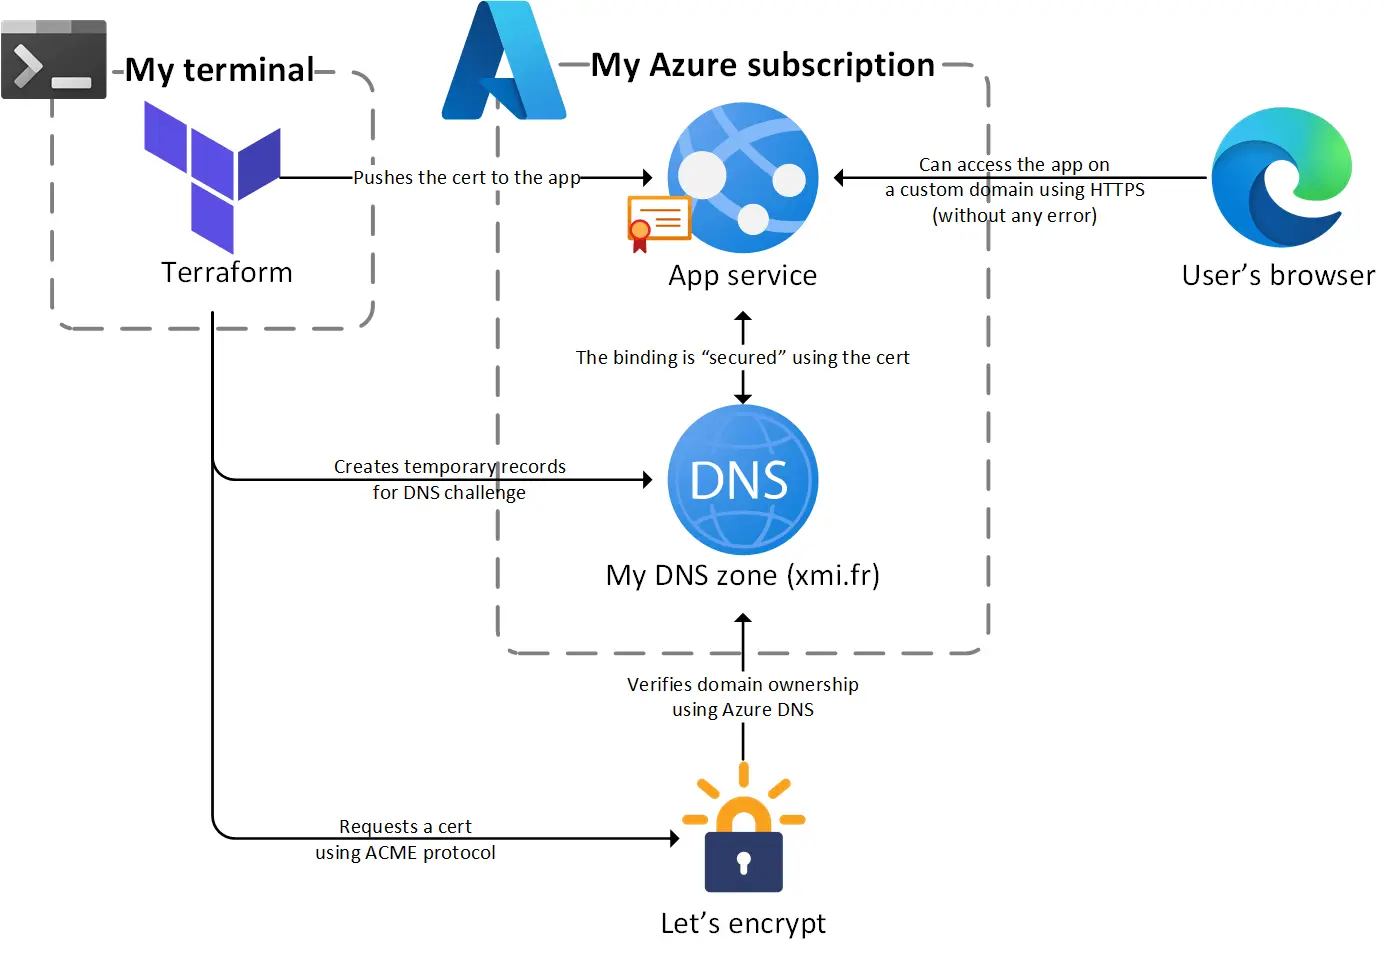
Back to the original diagram, here is where we are now:
 The certificate is now issued by a trusted CA before being bounded to the App Service
The next post will close the series with Azure managed certificates, a feature that deserves more attention 😉
Thanks for reading !